
In the two previous blogposts in this series I’ve covered how to get started with PCF components, how to add React to it, and how to test it in a canvas app. In this blogpost I will cover how work with PCF components and Dataverse solutions for different environments.
Blogposts in this series
Note, the other posts will be published in the next couple of weeks. The links will be updated – if the link is not active it is because the post is not published yet.
I’ll also assume that you know basic React and TypeScript.
Table of content
- Application Lifecycle Management (ALM) and Dataverse solutions
- How to create a solution, add PCF components, and deploy it
- Import the solution to Dataverse
- Summary
- Resources
Application Lifecycle Management (ALM) and Dataverse solutions
If you are new to development you might not be familiar with Application Lifecycle management so I thought I’d give a very short introduction. I’ve also added some links about this topic in the resource section if you want to read more about it.
Application Lifecycle Management (ALM) is the process in which we control the application through development, testing and release, and then maintenance. When developing applications we typically have different environments for different uses. There’s the developer environment where the developer test their app continuously while they’re creating it. Then there is typically a test/QA environment where the product owner/testers can test the application before it is released to the Production environment. The Production environment is where the app lives when it is available for the intended end users.
Application Lifecycle management is a set of processes and tools that we use to manage our application(s) in the different stages of its life.
What is Dataverse solutions?
Dataverse solutions, or Power Platform solutions (same thing – different name), is a way to maintain the application lifecycle management in Power Apps (and power automate). Simplified a solution is a collection of resources that can be deployed together.
Solutions and PCF components
In the previous part of this blogpost I showed you how you can use the command pac pcf push to deploy a temporary solution (containing your PCF component) to Dataverse. This is great for testing and developing, but you have to do the command for every one of your PCF components. So if you want to deploy more than one PCF component at once its easier (and faster) to use a solution. It is also not recomended to use the temporary solution for Production environments.
Managed vs unmanaged solutions, and how to use them in different environments
There are two types of Dataverse solutions, managed and unmanaged.
Unmanaged solutions
- Can be exported (as umnanaged or managed).
- If you delete it only the solution (the container) is deleted – not the content of the solution.
- Should be used for developer and test environments.
Managed solutions
- Can not be exported.
- When deleted all coztumiations inside the solution is also deleted. (If a managed solution have dependensies these have to be deleted before the solution can be deleted).
- Should be created from an unmanaged solution and concidered a build artifact.
- Should be used in production environments.
Read more about the different types of solutions in Microsoft documentation.
How to create a Dataverse solution, add PCF components and deploy it
Now that we have covered the basics about AML and solutions, lets get to the practical part of the blogpost – how to actually create a solution, add PCF components, and then how you build and deploy it to different environments. You can find the full democode used in this blogpost on github.
Create solution
First you need to create a new folder that will hold your solution. In my example I named the folder DataverseSolutionDemo. Navigate inside of this folder from your prefered CLI, and use the below command to initialize the solution.
pac solution init --publisher-name <your name> --publisher-prefix <prefix>
This will generate a folder structure and some files.

There are two files you should take a look at; the solution file, thats the file that ends with .cdsproj and the solution.xml file (you’ll find this in the src/Other folder).
The solution.xml file
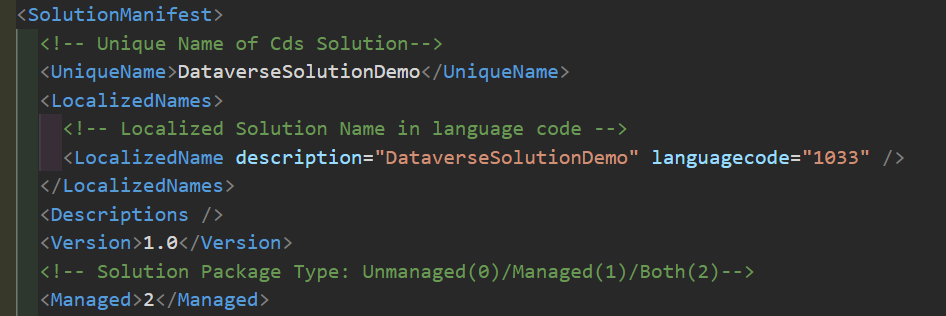
This file describes your solution. What name it has, current version, and if it is managed(1), unmanaged(0) or both (2 – can be deployd as either). It also has a section about the solution publisher (not displayed in the above image). For this demo you can ignore this file, but you should know where to find it.
The .cdsproj file
This file will contain the references to your components, so we will take a look at it after the references has been added.
Add PCF components to the solution
When the solution is created it is time to add the references to your PCF components. From the folder of your solution, run the command
pac solution add-reference --path "path-to-PCF-component-pcfproj-file"
The path can be absolute, or relative to the solution folder. For the DataverseSolutionDemo the path is "..\PCF-React-demo-component\PCF-React-demo-component.pcfproj".
When the reference is added it will show up in the .cdsproj file. In the below image you can see that I have added both my PCF components to the solution.

Build and deploy your solution
When you have added the references it is time to build your solution. Note, to be able to run msbuild you need to add it to your global path, or run the command from visual studio command promt.
The first time you build the solution you run msbuild with /t:build and /restore. This will both build the solution and restore the dependencies it needs.
msbuild /t:build /restore
When you have made changes in your component and need to rebuild the solution you can use /t:rebuild.
msbuild /t:rebuild
Both the above commands will build a unmanagaed solution for you. And the built solution can be found in the bin/Debug folder that is created the first time you build.

Building for production
When you are ready to build for production you add the release flag to your command like shown below.
msbuild /t:rebuild /p:configuration=Release
This will build a managed solution that will be created in the bin/Release folder of your project.

Importing the solution into Dataverse
Use CLI with unmanaged solution
First you need to create a connection to your environment
pac auth create --url https://myenvironment.crm4.dynamics.com
If you have multiple auth connections set up you can see which one is active by running pac auth list, and change to a different connection by using pac auth select --index <number>.
When you have your connection run the pac solution import command to start the import.
pac solution import --path "./bin/...." -pc
The -pc flag stands for “publish changes” and when working with unmanaged solutions you need to add this flag for the PCF components to update. Note, if you try to import the without this flag, or you do it manually, the solution import will work – but the changes in your PCF component won’t show up.
You can use the same command to import managed solutions as well.
Import manually
When working with managed solutions you can also import it through the user interface. Note, this will not work with unmanaged solutions – that to say, the import will work but your PCF components will not be updated. As far as I can tell from talking to other developers this is a known bug – but I was not able to find any sources on it.
Navigate to Solutions and select “Import solution”. Select the solution you would like to import and click next – after the solution is verified click import.

Summary
In this blogpost you learned that working with solutions is a way to manage your applications lifecycle. And that there are two different types of solutions (unmanaged/managed) that should be used for different scenarios.
You also learned that you can use add-reference to add your PCF components to a solution, and how to build your solution for different environments.
Lastly we covered how to import solutions from your CLI (works for both types of solutions) and that you can import managed solution manually and the PCF components will update (this will not work for unmanaged solutions).
Resources
- Power App Component Framwork overview (Microsoft docs)
- Introduction to Solutions (Microsoft docs)
- Application Lifecycle Management with Microsoft Power Platform (Microsoft docs)
- Best practices for code components created using Power Apps Component Framework (PCF) (Microsoft docs)
- Code component Lifecycle Management (Microsoft docs)
- Package and deploy code components (Microsoft docs)
- pac pcf push FAQ (Power apps comminity)

If you are interested in Microsoft 365 Development you might also like my other blogposts in this category.
Also, if you have any feedback or questions, please let me know in the comments below. 🙂
Thank you for reading, and happy coding!
/Eli
If you want to support my content you can
Hi, It is a nice content,
I tried to build something with this example and but when I try to add reference using following getting error “”, Any idea why, tq
PS C:\Narendra\PCFNew> pac solution add-reference –path C:\Narendra\PCFNew
Microsoft PowerPlatform CLI
Version: 1.32.8+gf89d946
Online documentation: https://aka.ms/PowerPlatformCLI
Feedback, Suggestions, Issues: https://github.com/microsoft/powerplatform-build-tools/discussions
Error: Dataverse solution project file with extension ‘.cdsproj’ was not found in the directory.
Regards,
Naren
Hi! Like the error sais “Dataverse solution project file with extension ‘.cdsproj’ was not found in the directory.” Its asking about the .cdsproj which is for the entire solution. And from your example it looks like you are inside of your PCFNews component folder (C:\Narendra\PCFNew>) – which is the same as the component you are trying to add.
You should navigate inside the *solution* folder and add the pcf reference from there 🙂