
As a consultant, I frequently encounter requests from various clients for a specific feature: a customizable web part on their intranet where users can personalize and add their preferred tools from a predefined list. While the specific requirements may vary across clients, I recognized the recurring need for a foundational solution that could be easily tailored to each client’s unique specifications. That why I decided to create a customizable ‘boilerplate’ with essential functionality, designed to serve as a flexible starting point for future expansions and customizations. And now I’m sharing it with you in this blogpost how I used SPfx and PnPjs to build this sample.
Prerequesites: You need to know basic front-end programming including React and have your dev environment setup with the requirements detailed here (Microsoft docs).
I won’t go through every part of creating the webpart with Spfx and PnPjs, but will explain how the components are built, and how PnPjs is used to communicate with SharePoint.
Source code: You can find the full source code for this example on my github.
TL;DR
If you don’t care how it works – just that it works, you can go to my GitHub repo and find the full runable source coude there. The README.md will explain how to get the sample up and running.
Table of contents
- How the webpart looks and works
- Setting up the needed lists in SharePoint
- Explaining the code – whats happening where
- Summary
- Resources
How the webpart looks and works
Lets start by taking a look at the finished webpart. This is how it looks before you have added any tools to your personal list.

The user can click on the “Edit” button to open the “Select tools” dialog. This will display tools that have been predefined in a list (more about the lists in the next section of this blogpost)

When clickling on “Save changes” the current users email, and their selected tools will be saved in another list. And the tools are displayed like this.

The webpart title can be changed in the property pane, and there you can also choose if the tools should be displayed in 1 or 2 columns.

Setting up the needed lists in SharePoint
Since you are reading this blogpost I’ll asume that you allready have a Microsoft 365 tenant where you would like to add the webpart. If not you can register for a free dev tenant her.
You need two lists on the SharePoint site where the webpart will be living. One list for “AvailableTools” where the tools, aka links will live. And one “PersonalTools” where the users selection will be saved. The lists will need the following fields (columns):
- AvailableTools list
- tool_name | Text field
- tool_url | Text field
- PersonalTools list
- tool_username | Text field
- tool_usertools | Note /multi line text field
I use PnP PowerShell to create content types and lists, you can use the code below to create the exact lists used in my code.
# Connect to site
$envurl = "INSERT URL TO SHAREPOINT SITE HERE"
Connect-PnPOnline -Interactive -Url $envurl

#Create content types
Add-PnPContentType -Name "ToolItem" -ContentTypeId "0x0100b2a59b27e25341959bc1687f68d1785e" -Group "Custom" -Description "Content type to hold information about the tool"
Add-PnPContentType -Name "PersonalTools" -ContentTypeId "0x01001ba482dd07974a06a154ce8bc0240bed" -Group "Custom" -Description "Content Type to hold info about the current users selected tools"

#Add Fields
Add-PnPField -InternalName "tool_name" -DisplayName "Tool display name" -Type Text -Group "Tools"
Add-PnPField -InternalName "tool_url" -DisplayName "Tool url" -Type Text -Group "Tools"
Add-PnPField -InternalName "tool_username" -DisplayName "User email" -Type Text -Group "Tools"
Add-PnPField -InternalName "tool_usertools" -DisplayName "Personal Tools Settings" -Type Note -Group "Tools"

#Add fields to content type
Add-PnPFieldToContentType -Field "tool_name" -ContentType "ToolItem"
Add-PnPFieldToContentType -Field "tool_url" -ContentType "ToolItem"
#Add fields to content type
Add-PnPFieldToContentType -Field "tool_username" -ContentType "PersonalTools"
Add-PnPFieldToContentType -Field "tool_usertools" -ContentType "PersonalTools"


#Create list and add CT
New-PnPList -Title "AvailableTools" -Url "lists/availabletools" -Template GenericList
Add-PnPContentTypeToList -List "AvailableTools" -ContentType "ToolItem"


#Create list and add CT
New-PnPList -Title "PersonalTools" -Url "lists/personaltools" -Template GenericList
Add-PnPContentTypeToList -List "PersonalTools" -ContentType "PersonalTools"
Explaining the code – whats happening where
Creating the webpart from scratch using SPfx and PnPjs
I won’t cover every step in this blogpost, but if you are familiar with SPfx and React, and you would like to create your own webpart from scratch feel free to do so.
You can run yo @microsoft/sharepoint, follow the steps and select “Webpart” and “React” for framework.
I’ve used Material UI as the UI framwork, but you could use any UI framework you would like. You also need to install PnP sp, PnP logging and PnP graph if you want to follow along with my sample.
npm install @mui/material @emotion/react @emotion/styled @pnp/sp @pnp/logging @pnp/graph
A look at the overall file structure
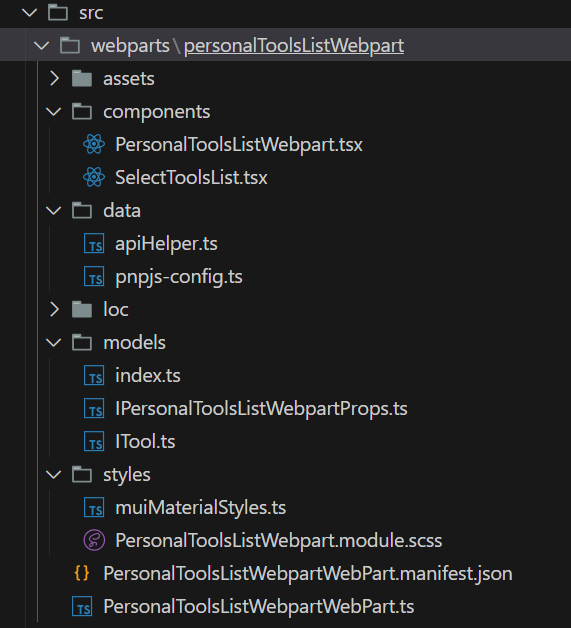
I’ve devided the source code into 4 main folders inside the src/webpart/personalListWepart folder.
- components – contains tsx components
- data – contains files that handles the api and data mapping
- models – contains interfaces
- styles – containes styles
The assets and loc folders came with the SPfx generator – and I havn’t bothered to delete them.
Components
The webpart has only 2 components – one for the overall list “PersonalToolsListWebpart.tsx”, and one for the list that is displayed in the dialog “SelectToolsList.tsx”.
PersonalToolsListWebpart
There are 4 different state hooks.
- open, setOpen – handles the open/close of the “Select tools dialog”
- myTools, setMyTools – holds the currents users tools
- errorMessage, setErrorMessage – handles errorMessages
- selectableTools, setSelectableTools – holds the predefined tools from “Available tools” list
  /** === USE STATE HOOKS === */
  const [open, setOpen] = React.useState(false);
  const [myTools, setMyTools] = React.useState<Array<ITool>>([]);
  const [errorMessage, setErrorMessage] = React.useState<string | undefined>(
    undefined
  );
  const [selectableTools, setSelectableTools] = React.useState<Array<ITool>>(
    []
  );
There are two use effect hooks. One that handles the initial setup (on load), and one that is “listening” to the “myTools” state – and displaying/hiding error message based on if the myTools list is emty or not.
/** === USE EFFECT HOOKS === */
  React.useEffect(() => {
    (async () => {
      const tmpTools = await getUsersTools(props.context, props.userEmail);
      if (tmpTools) {
        setMyTools(tmpTools);
      } else {
        setErrorMessage(
          errorMsgNotFound
        );
      }
      const tmpSelectTools = await getSelectableTools(props.context);
      if (tmpSelectTools) {
        setSelectableTools(tmpSelectTools);
      }
    })();
  }, []);

  React.useEffect(() => {
    if (myTools.length > 0 && errorMessage) {
      setErrorMessage(undefined);
    }
    if(myTools.length === 0){
      setErrorMessage(
        errorMsgNotFound
      );
    }
  }, [myTools]);
And there are 3 functions. Two that handles open/closing of dialog. And one function that handles the saving of selected tools.
  /** === FUNCTIONS === */
  const handleClickOpen = (): void => {
    setOpen(true);
  };
  const handleClose = (): void => {
    setOpen(false);
  };

  const handleSave = (checked: Array<ITool>): void => {
    setOpen(false);
    (async () => {
      const updateSucess = await updateUsersTools(
        props.context,
        checked,
        props.userEmail
      );
      if (updateSucess) {
        const tmpTools = await getUsersTools(props.context, props.userEmail);
        if (tmpTools) {
          setMyTools(tmpTools);
        } else {
          setErrorMessage(
            errorMsgNotFound
          );
        }
      } else {
        setErrorMessage(
          errorMsgOnSave
        );
      }
    })();
  };
The tsx is mostly straight forward, but one thing to note is that the “SelectToolList” component gets the handleSave function, and the myTools and selectableTools state as props.
<SelectToolList
            handleSave={handleSave}
            myTools={myTools}
            selectableTools={selectableTools}
          />
SelectToolList
This is a small component and the only thing it needs to keep track of is what tools are selected from the list. It does so with the state “checked, setChecked”, and the function handleToggle that is triggered when one of the checkboxes is clicked.
const [checked, setChecked] = React.useState<Array<ITool>>(props.myTools);

  const handleToggle = (tool: ITool) => () => {
    const alreadySelected = checked.some((t) => t.key === tool.key);
    const newChecked = [...checked];

    if (!alreadySelected) {
      newChecked.push(tool);
      setChecked([...newChecked]);
    } else {
      const tmp = checked.filter((t) => t.key !== tool.key);
      setChecked([...tmp]);
    }
  };
Using PnP js to get/write data
Lets first take a look at the “pnpjs-config.ts” file.
This is a copy of Julie Turners config explained in her blogpost “Getting started with PnPjs”. Basically its a centralized way of creating the SharePoint Factory Interface (SPFI) and the Graph Factory Interface (GraphFI), read more about it in her blogpost linked above.
let _sp: SPFI;
let _graph: GraphFI;

export const getSP = (context: WebPartContext): SPFI => {
  if (context !== null) {
    //You must add the @pnp/logging package to include the PnPLogging behavior it is no longer a peer dependency
    // The LogLevel set's at what level a message will be written to the console
    _sp = spfi().using(SPFx(context)).using(PnPLogging(LogLevel.Warning));
  }
  return _sp;
};

export const getGraph = (context: WebPartContext): GraphFI => {
  if (context !== null) {
    //You must add the @pnp/logging package to include the PnPLogging behavior it is no longer a peer dependency
    // The LogLevel set's at what level a message will be written to the console
    _graph = graphfi()
      .using(graphSPFx(context))
      .using(PnPLogging(LogLevel.Warning));
  }
  return _graph;
};
Now lets take a look at the apiHelper.ts file, which is where all the communication with SharePoint happen.
getUserTools
This function gets the users saved tools from SharePoint. If the user has not saved any tools yet it returns ‘undefined’.
export const getUsersTools = async (
  context: WebPartContext,
  currentUserMail: string
): Promise<Array<ITool> | undefined> => {
//getting the SharePoint Factory Interface object from pnpjs-config - sending in the webpart context
  const sp = getSP(context);

//using the object to get the items from the list
  const requestRes = await sp.web.lists
    .getByTitle("PersonalTools")
    .items();
  const userTools = requestRes.filter(
    (userTools) => userTools.tool_username === currentUserMail
  );

  if (userTools.length === 1) {
    const tools = JSON.parse(userTools[0].tool_usertools);
    return tools;
  } else {
    return undefined;
  }
};
getSelectableTools
This function gets the predefined tools from the list “AvailableTools” and maps them into “ITool”-objects and returns them in an array
export const getSelectableTools = async (
  context: WebPartContext
): Promise<Array<ITool>> => {
  const sp = getSP(context);
  const requestRes = await sp.web.lists.getByTitle("AvailableTools").items();
  const tools = requestRes.map((tool) => {
    return {
      toolName: tool.tool_name,
      toolUrl: tool.tool_url,
      key: tool.ID,
    } as ITool;
  });
  return tools;
};
updateUsersTools
This is the function that will update the UsersTools. It first checks if the user allready have saved tools to the list. If yes, it updates the same item with new selection of tools. If no, a new item is added to the list.
export const updateUsersTools = async (
  context: WebPartContext,
  userTools: Array<ITool>,
  currentUserMail: string
): Promise<boolean> => {

  const sp = getSP(context);
  const requestRes = await sp.web.lists
    .getByTitle("PersonalTools")
    .items();
  const tmpTools = requestRes.filter(
    (userTools) => userTools.tool_username === currentUserMail
  );
  //create object to be added or updated
  const toolString = JSON.stringify(userTools);
  const userToolsObject = {
    Title: currentUserMail,
    tool_usertools: toolString,
    tool_username: currentUserMail,
  };
  if (tmpTools.length === 1) {
    const update = await sp.web.lists
      .getByTitle("PersonalTools")
      .items.getById(tmpTools[0].ID)
      .update(userToolsObject)
      .then((res) => {
        return true;
      })
      .catch((error) => {
        console.log(error);
        return false;
      });
    return update;
  } else if (tmpTools.length === 0) {
    const addItem = await sp.web.lists
      .getByTitle("PersonalTools")
      .items.add(userToolsObject)
      .then((res) => {
        return true;
      })
      .catch((error) => {
        console.log(error);
        return false;
      });
      return addItem;
  }
  return false;
};
Summary
In this blogpost we have looked at the main parts of the “My tools” webpart sample. You can find the full source code on my GitHub.
Resources
- Getting started with PnPjs (Julie Turner)
- PnPjs docs
- PnP Powershell
- Getting started with SPfx (Microsoft docs)
- How to deploy your SPfx solution using PnP powershell

Did you find this article usefull? Follow me on twitter to be notified when I publish something new!
If you are interested in Microsoft 365 Development you might also like my other blogposts in this category.
Also, if you have any feedback or questions, please let me know in the comments below. 🙂
Thank you for reading, and happy coding!
/Eli
If you want to support my content you can