
When you develop an app in the Microsoft 365 sphere (SharePoint webpart, Teams app, etc), you often need to authenticate either the app, the user, or both – to get to the information you need. If you’re a front-end developer (like me) you migt want to do everything in the client app. But depeding on what type of authentication flow you need this could be a security risk. Thats why I often create a small azure function for authentication as part of my solutions, so the authentication can be handled backend, but with front-end code. Because, yes – you can write Azure functions using TypeScript and node – yay!
Table of contents
- A (very) short introduction to Azure functions
- Create the function
- The MSAL config
- Getting the token
- Creting a Function app and deploying your function(s)
- Summary
- Resources
TLDR; Jump straigt to the summary for the bullet point version.
(Very) short introduction to Azure functions
So this blopost will ba an ‘hands on example’ where I show you how to create a http trigger to use for authentication. But if you are brand new to Azure functions I thought I should start by giving you a very short introduction to what Azure functions are.
“Azure Functions is a serverless solution that allows you to write less code, maintain less infrastructure, and save on costs”
Microsoft documentation
Simply said its a way of creating, deploying and managing small (or large) event triggered code components – with less fuss because you don’t need to worry about the server infrastructure.
There are different kinds of Azure functions triggers. In this blogpost I’ll be using a http trigger wich gives us an url endpoint we can use to get the token from our client application. For more about the different types of triggers and bindings take a look at Microsofts own documentation.
Functional app vs function
To host your function(s) in Azure you need to create a functional app. This works as a container for your functions. It will contain both the function(s) definitions, and also runtime info (Node in this example) , CORS settings ++.
Creating the function
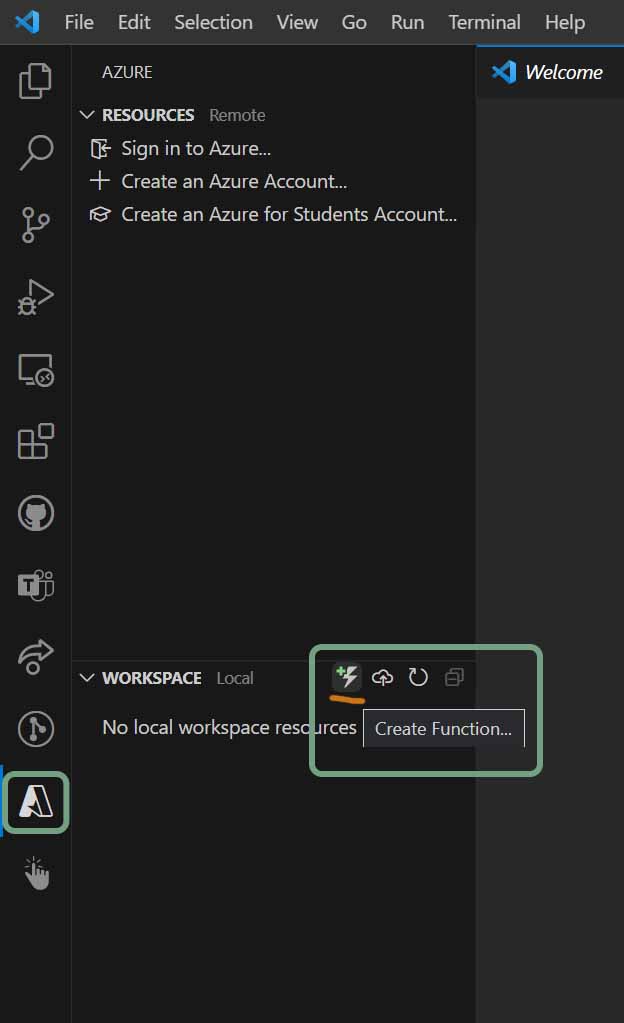
Start by opening up Visual Studio Code, and install the Azure function extension.
Open the extension and in the “Workspace” area, select the small lightningbolt to create a new function.
When prompted:
- Select a folder where you would like to save your function.
- Select TypeScript as language, and V3 in the next promt (per may 2023 v4 is still in preview – if you are reading this on a later date, v4 might be available)
- On the type of function select “Http trigger”
- Give the trigger a name, in my example it is called “getAuthToken”
- Lastley, on the athentication level prompt select “function”
A look at the http trigger file structure
Lets take a look at the file structure in the project that was created. In the main folder you have typical project files like .gitignore, local.settings.json, package.json, a folder for node_modules ++.
And you have a folder that has the name you selected in the previous step – in my example thats “getAuthToken”. Inside of this folder you will find the code for the actual httpTrigger.
function.jsonis a metadata/config file for the triggerindex.tsis the file that contains the ‘entry point’ and code for your httpTrigger.

If you open index.ts you can see that it contains the httpTrigger function. You can keep the name as is, but I like to give it the same name as the overall function, in this case that is “getAuthToken”.
The rest of the project is a typical ‘front-end project’. But one thing that is usefull to know is how to update the local.settings.json file to handle CORS when running locally.
The MSAL config
You need an App registration to authenticate against – if you don’t know how to create one follow the steps in the first section of this guide (you don’t need to do the other steps, like adding URI++)
To get a token from MSAL you need to know the tenant ID, the client-id (aka app registration id), and for the client credentials flow you also need to create an app-secret. The app registration is also where you decide the specific scope of access your app/user needs.
You could add all the below code directly in your function index.ts file, but in my example I’ve created a msalHelper.ts file, and put it in a folder named ‘common’.

Start by adding the variables for the MSAL config to your file.
Usually I would put these values in their own config file, but to keep this example as small and simple as possible I’ve kept it all in one file.
const tenantID = "<your tenant id>";
const appID = "<your app id>";
const appSecret = "your app secret"; //A best practice would be to put the secret in a key vault and not directly in the code
const authURL =
  "https://login.microsoftonline.com/" + tenantID + "/oauth2/v2.0/token";
const appSecret = ""
These are the variables you’ll need to get the token. Both your tenant ID, app ID and app secret can be found on the AAD app registration.
Getting the token
Install node-fetch
In javascript you can use “fetch” to run http requests, to do the same in node I use a helper package that’s called node-fetch.
//to install the latest version
npm i node-fetch

//to install the specific version used in this example
npm i node-fetch@2.6.6
Client credentials flow
Now that you have both your MSAL config variables, and node-fetch installed, you can do the request to get the access token.
I do this in a simple function that does a fetch and returns the token.
First we create a parameter variable and append the required parameters in there. These are the grant_type which in this example is “client_credentials” (the type of auth flow we are using). The “client_id” = the appID of your app registration. The “client_secret” is the secret you created on your app registration. And the scope can be set to default.
export const getToken = async (context?: any): Promise<string> => {
  let params = new URLSearchParams();
  params.append("grant_type", "client_credentials");
  params.append("client_id", appID);
  params.append("client_secret", appSecret);
  params.append("scope", "https://graph.microsoft.com/.default");

...
}
When the parameters are in place you can do the GET reques to the token endpoint using fetch.
  const token = await fetch(authURL, {
    method: "GET",
    headers: {},
    body: params,
  })
    .then((response) => response.json())
    .then((data) => {
      return data.access_token;
   });
Call the MSAL helper from the http trigger
Go back to your index.ts file. Import the getToken function from msalhelper, call the function to get the token – and send the token back in the response body.

And thats it. Now you can deploy your function to your function app, and use your endpoint to get a token that grants you the same persmissions that is registred on your app registration.
On behalf of flow
Since this blogpost is allready very long – I won’t cover the “on behalf of flow” in this blogpost, but I thought I should mention it. (Feel free to leave my a comment if you would like for me to write a blogpost about ut as well).
In some cases you want to authenticate on behalf of the user that is currently using your app. When that is the case you should use the “on behalf of flow”. In short that flow requires you to get an identity token from the context of the current user – and then send that token to the auth endpoint to get a ‘personal’ authentication token based on the current users permissions. Here is a link to Microsoft documentation on the subject.
Creting a Function app and deploying your function(s)
To host your new function in Azure you need to create a functional app. You do this by logging into portal.azure.com, selecting (or searching for) function app.
In the Function app overview page select “Create”

Fill in required information. Remember to select node as runtime for your app.

Go back to Visual Studio code and select the Azure extenstion. In the workspace area – select the small azure function icon – and the deploy to Function app. You will be promted to select an app, and then your function will be deployed.

Summary
- Create a new function using the Azure function extension for VS Code.
- Select a folder where you would like to save your function.
- Select TypeScript as language
- On the type of function select “Http trigger”
- Give the trigger a name, in my example it is called “getAuthToken”
- Lastley, on the athentication level prompt select “function”
- Create a MSALHelper file with the below code
const fetch = (url: RequestInfo, init?: RequestInit) =>
  import("node-fetch").then(({ default: fetch }) => fetch(url, init));

const tenantID = "<your tenant id>";
const appID = "<your app id>";
const appSecret = "your app secret"; //A best practice would be to put the secret in a key vault and not directly in the code
const authURL =
  "https://login.microsoftonline.com/" + tenantID + "/oauth2/v2.0/token";


export const getToken = async (context?: any): Promise<string> => {
  let params = new URLSearchParams();
  params.append("grant_type", "client_credentials");
  params.append("client_id", appID);
  params.append("client_secret", appSecret);
  params.append("scope", "https://graph.microsoft.com/.default");

  const token = await fetch(authURL, {
    method: "GET",
    headers: {},
    body: params,
  })
    .then((response) => response.json())
    .then((data) => {
      return data.access_token;
    });

  //for debugging - if the context is passed in as a parameter it will log what is returned from the auth endpoint - hopefully your token
  if (context) {
    context.log(token);
  }
  return token;
};
- In the index file, import the getToken function from the msal helper, and call it to get the token. Return the token in the response body
import { AzureFunction, Context, HttpRequest } from "@azure/functions"
import { getToken } from "../common/msalHelper";

const getAuthToken: AzureFunction = async function (context: Context, req: HttpRequest): Promise<void> {
    context.log('HTTP trigger function processed a request.');

    const token = getToken();

    context.res = {
        // status: 200, /* Defaults to 200 */
        body: token
    };

};

export default getAuthToken;
- Create a function app in azure portal, selecting node.js as runtime, and deploy your function to that app.
Resources
- Azure functions documentation – Microsoft docs
- Use Key Vault references for App Service and Azure Functions – Microsoft docs
- On behalf of flow – Microsoft docs

Did you find this article usefull? Follow me on twitter to be notified when I publish something new!
Also, if you have any feedback or questions, please let me know in the comments below. 🙂
Thank you for reading, and happy coding!
If you want to support my content you can/Eli
1 thought on “Create an azure function for authentication with Microsoft Authentication Library (MSAL), using node and TypeScript”