
Back in April last year I published two parts in what was ment to be a 3-4 part blogpost series about Power App Component framework. But then I got busy with lots of other technologies and I’ve had the “write part 3” on my to do list since then. And now, when I finally found the time I realise I’ve gotten way better at this blogging thing (If I might say so myself), and I’m joining a new project this month where Power Apps and PCF will be a big part of it. So I want to start over and make a even better guide (hopefully). So welcome to the comprehensive guide to Power Apps component framework!
In this first part I will cover what PCF is, how to create your very first component, what the different files that are generated for you are used for, adding a simple html element to your component, and testing it locally.
A comprehensive guide to Power Apps Component framework
Note, the other posts will be published in the next couple of weeks. The links will be updated – if the link is not active it is because the post is not published yet.
Table of content
- What is Power Apps Component framework (PCF)?
- Set up your developer environment
- Create your first component with Power Apps CLI
- PCF project files overview
- Running your component locally
- Summary
- Resources
What is Power Apps Component framework (PCF)?
Lets start by looking at the bigger picture and clarify some names/words/phrases that you might come accross. If you, like me, are comming from a developer background you might not be familiar with the Power Platform structure, and how it all fit together.
Power Platform – A collection of tools that lets you analyze data, build solutions, automate processes and more. Consists of Power BI, Power Apps, Power Automate and Power Virtual Agents.
“Power Apps is a suite of apps, services, and connectors, as well as a data platform, that provides a rapid development environment to build custom apps for your business needs” (Microsoft docs).
You can create three types of Power Apps; Canvas apps, Model driven apps or Portals.

So where do Power App Component framework fit in the bigger picture?
As the name suggests it is a framework to create (code) components that can be used accross apps. You can add a PCF component to model driven apps, canvas apps and portals. You can also add them in Dynamics 365 forms/views (I describe this in the ‘old’ version of this series).
What are the benefits of using PCF?
Since you control the source-code it gives you a lot more freedom to develop user friendly and good looking components that are focused on solving your specific business needs. You can also add third party libraries/framweorks, like React or Vue.
The PCF component comes with its own context which gives you easy access to data and API’s. And through the PCF component manifest you can also enable device features such as camera or microphone to be used in your component.
Who is PCF for?
The target audience for PCF are professional developers, you need to have basic web development skills like javascript/typescript, usin npm ++.
Set up your developer environment
You should be familiar with basic web developwment. Like how to set up your dev environment. This blogpost will tell you what you need to install, but not how to install it.
Get a developer tenant
If you are going to be working with PCF (or other Microsoft 365 related technology) I hightly recomend that you register for a free developer tenant in Microsofts Developer program.
Pros:
- You can develop and test things without having to worry about someone else
- You have full admin privileges on your tenant so you don’t need to ask someone else to enable settings just for development purposes.
Cons:
- If you need a lot of data that are available in some other tenant it might be easier to do the testing there.
When working with Power Apps you also need to get the Power Apps developer plan (this is also free).
Local developer environment
To get your PCF developer environment up and running you need to insall node.js (to use npm), .Net Framework 4.6.2 (to use msbuild) and PowerApps CLI (to create, test and deploy your component). If you have Visual Studio 2017 (or later) you allready have the required version of .Net.
Note: If you are using another CLI than the Visual Studio command promt you need to add msbuild to your global path to be able to run it.
Create your first component with Power Apps CLI
Initializing and creating your project
Open your prefered CLI and navigate to the folder where you would like to create the project. Create a new project-folder and navigate into it. Use the below command to create your project.
pac pcf init -n "name" -ns "namespace" -t [dataset or field ]
“Name” (-n) is the project name. Only characters within the ranges [A – Z], [a – z] or [0 – 9] are allowed, and the first character can’t be a number.
“NameSpace” (-ns) is the namespace for the project.
“Type” (-t) can be either dataset or field. For this demo I used the type field.
What is the difference between type “Field” and “Dataset?
When the type is set to “Field” the component will be expected to be bound to a field (or more than one). And if it is of type “Dataset” it will be bound to a dataset, this can be a view, a sub-grid or a gallery. The different types will have some differences in the manifest file that desctibes the component metadata. We will cover the manifest file, and the other project files in the next section of this blogpost.
PCF Yeoman generator
You can also use the PCF yeoman generator to scaffold your component. As far as I can see the PowerApp CLI and the yeoman generator mostly generate the same output. Except that if you use the yeoman generator you can decide if you want to add react, or react+fluid when the project is created. You also get a css folder and css-file created automatically. If you use the PowerApps CLI command you need to add react as an extra step afterwards (I will cover this in the next blogpost in this series).
PCF project files overview
Lets take a look at the different files that are generated within your PCF project
Manifest file

The manifest file defines metadata about your component. From here you can control the component namespace, version and name. You can also add which properties, datasets or resources should be available to your component.

- namespace Namespace of the control (required)
- constructor. This is the name of your component (required)
- version (required)
- display-name-key Name of the control that is displayed in the UI (required)
- description-key: Description in UI (required)
- control-type: only one option “standard”. (required)
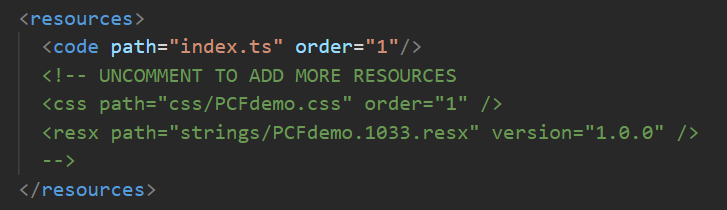
In the resources section you can add reference to more resources. Yo do not however need to add a <code /> entry for all your code files, you can import/export them directly in the code-files. I’ll cover this too in the next blogpost.
Differences in manifest for type “Field” and “Dataset”
As mentioned in the previous section, if you set the type of your PCF component to be “Field” it will be expecting to be bound to one or multiple fields. In the manifest you need to have one (or more) properties that describes what type of field(s) the component can be bound to.

A PCF component of type dataset on the other hand, requires a “data-set” attribute that can be bound to a view, sub-grid or gallery.

Configuration files

If you have worked on a front-end project before you probably recognize most of these files. But here are a short summary for each of them
- eslintrc – manage linting rules
- gitignore – defines which files should be kept out of git source control.
- package.json – defines the projects dependencies, and npm scripts.
- package-lock.json – is created automatically based on package.json
- pcfconfig – configuration for pcf projects build process.
- tsconfig – typescript configuration.
Project file

The file .pcfproj file is the component project file. The name is based on the folder where you initialized your component.
index.ts
Index.ts is the main code file. This is where you find all the component lifecycle functions. We will take a closer look at this file, and adding more code-files in the next blogpost in this series.

We will go deeper into the lifecycle functions in the next blogpost, but here is a short overview:
- init – This function gets invoked when the component is loaded. It takes four parameters context, notifyOutputChanged, state and container.
- updateView – This is invoked when there has been external changes and the component needs to refresh to reflect those changes.
- getOutputs – if your component changes data this function can be used to return those data. This is the only function that is not required, and you need to implement the callback function “notifyOutputChanged” for the framework runtime to notify the app where your component is running of the data changes.
- destroy – this function is invoked when your component is beeing removed from the DOM tree.
Except from getOutputs() they are all required.
Running your component locally
Before you can test your component locally you need to add some html so that there is something to look at.
Exchange the emty constructor and init function with the code below. This will give you a simple html label element.
	private _container: HTMLDivElement;
	private _labelElement: HTMLLabelElement;

	constructor()
	{

	}

	public init(context: ComponentFramework.Context<IInputs>, notifyOutputChanged: () => void, state: ComponentFramework.Dictionary, container:HTMLDivElement): void
	{
		this._container = document.createElement("div");
		this._labelElement = document.createElement("label");
		this._labelElement.innerHTML = "This is my PCF component";
		this._container.appendChild(this._labelElement);
		container.appendChild(this._container);
	}
Tip: If you have issues with eslint complaining in your index.ts file. Add /* eslint-disable */ in the top of your file. Note that on a long term project its better to customize the rules to your liking – or fix the errors. But for demo/trial purposes disabling it is a quick-fix.
Save the changes in index.ts and run the command “npm start watch” to start the local server and open up the “testing workbench”.

And there you can see your first PCF component! When the local server is running it will automatically detect changes you make to your component – so its a good way to develop your GUI continuously. Running the component locally is also a good way to familiarize yourself with the code – try out different things – without having to worry about a bigger environment.
Summary
In this blogpost I covered what the Power App Component framework is, and what benefits you get from using it. I also tell you how to setup your developer environment, generate your first component, adding some simple html to that component and running it locally.
In the next blogpost I will cover how to add React to your PCF project and use it to build a small form that you can use to collect user input. We will also take a look at how you can add your component to a canvas app.
Resources
- Power Apps Component Framwork Overview (Microsoft Docs)
- Create your first component (Microsoft Docs)
- Create components with Power Apps Component Framework (Microsoft Learn Modules)
- Sample components (Microsoft Docs)

If you are interested in Microsoft 365 Development you might also like my other blogposts in this category.
Also, if you have any feedback or questions, please let me know in the comments below. 🙂
Thank you for reading, and happy coding!
/Eli
If you want to support my content you can
3 thoughts on “A comprehensive guide to Power Apps Component framework (PCF): Part 1 – Getting started”